-WebP.webp)

Safety Precautions while using a Sewing Machine
- omemy tutorials

- Nov 1, 2021
- 6 min read
Updated: Jun 17, 2025

Tips for Personal Safety while using a Sewing Machine
1. Fingers at a safe distance from the needle
It is important to keep your fingers at a safe distance from the presser foot and machine needle. Although, there cannot be an exact guidance about how far should your finger be from the needle, it is recommended to keep your fingers approximately 1’’ away from the needle. More than often sewing accidents happen with the machine needle piercing the fingers.

This could happen when sometimes the hands, while manoeuvring the fabric, keep moving with the rhythm and mistakenly get too close to the machine needle. There could be accidents, when workers are changing/ tightening or adjusting the presser foot/machine needle or examining the sewing area without switching off the machine and accidently press the foot pedal. Therefore, first golden rule for using a sewing machine safely is to keep your fingers away from machine needle as much as possible and keep the machine switched off when it is necessary to bring your fingers close to the sewing area.
2. Hair to be managed properly
Long, open hair can unsettle both the machine and the worker and cause or initiate major accidents. While there is always a possibility of long hair getting entangled with the machine needle, hair flicks can disturb view and unsettle the worker causing machine accidents. It is advisable to tie the hair at the back of the head while working on a sewing machine.
3. Pincushion for pins & needles
One of the most hazardous accidents while using a sewing machine happen when workers unknowingly swallow the pin or machine needle. It is not advisable to hold the needle or pin between your lips, even if it is for a few seconds. Keeping a pin-cushion or magnetic pin box close to your work area proves handy in managing pins and needles while working on the sewing machine.
4. Keep scissors wisely
Serious accidents, like sharp edge of a heavy pair of scissors falling on toes, scissor poking hands and unintentional cuts can happen by not keeping scissors properly when not in use. It is advisable to always rest scissors, in closed position, in appropriate place, which is reachable by hands but not cluttering the work table.
5. Switch On/Off & Unplug
Sewing machines should not be kept switched on when not in use. Keeping them switched on when not in use can cause needle prick accidents like mentioned above and there are other possibilities of machine damage because of unnecessary, constant power supply to the machine.
6. Careful with electricity
Long wires are essential part of sewing machine kit. These wires need to be kept in good condition to ensure the user doesn’t get an electric shock. Any cuts, twists or damages to the electric cables should be immediately attended and fixed. It is not advisable to use wires with multiple, local fixes. Such wires should be replaced as soon as possible. Rolling electric cables systematically and placing them in the cover pocket when machine is not in use can prolong the life of electric cables.
7. Keep work table decluttered
Work table clutter can impact worker safety in multiple ways. A cluttered desk can increase the possibility of freak accidents like heavy equipment falling on the worker, supply box spills and fabric damage. Organised work-table improves worker efficiency in terms of time and work quality and also keeps the worker safe to a large extent.
8. Keep attentive
It is important to keep attentive to your fabric while it is being fed into the sewing machine. Sewing machines, howsoever advanced they are, need worker’s undivided attention. Whole lot of sewing machine accidents happen when workers are distracted by conversation, screens or trying to multitask.
Tips for Sewing Machine safety
1. Always place pins perpendicular to the stitching line

It is a common practice to pin layers/folds of fabric in place before a seam is placed. It is important to always place these pins perpendicular to the direction of the stitch line. This helps in preventing lateral shifting of layers from the marked position. Also, this ensures easy removal of pins while sewing.
2. Do not sew over pins

While it is important to pin layers & folds to ensure sewing in the right place, stitching over pins can cause multiple damages to your sewing machine; most prevalent being needle breakage & needle bending. It is therefore advisable to keep pulling out pins as the said area approaches the pressure foot. This would be an easy task if the pins are placed perpendicular to the stitch line.
3. Do not try to take the bobbin out while needle is still dipped in
Never try to pull the bobbin out of the bobbin cavity while the machine needle is still dipped in the presser foot.
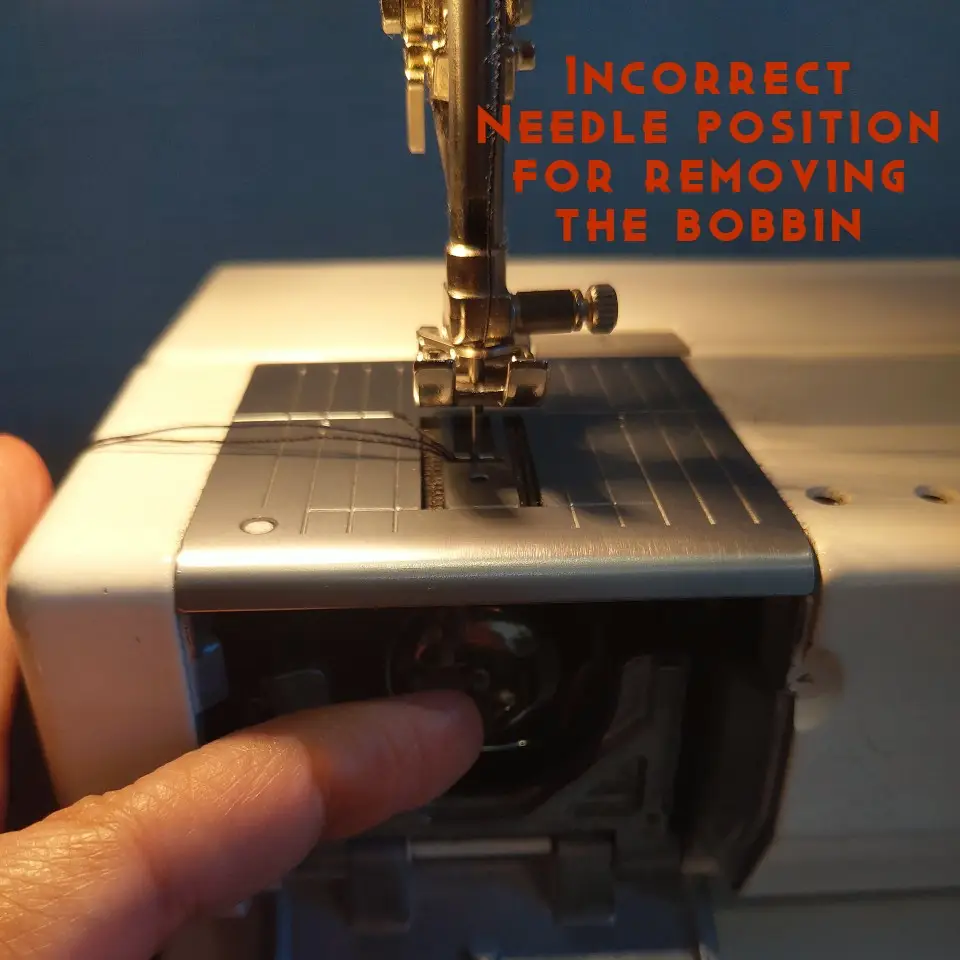
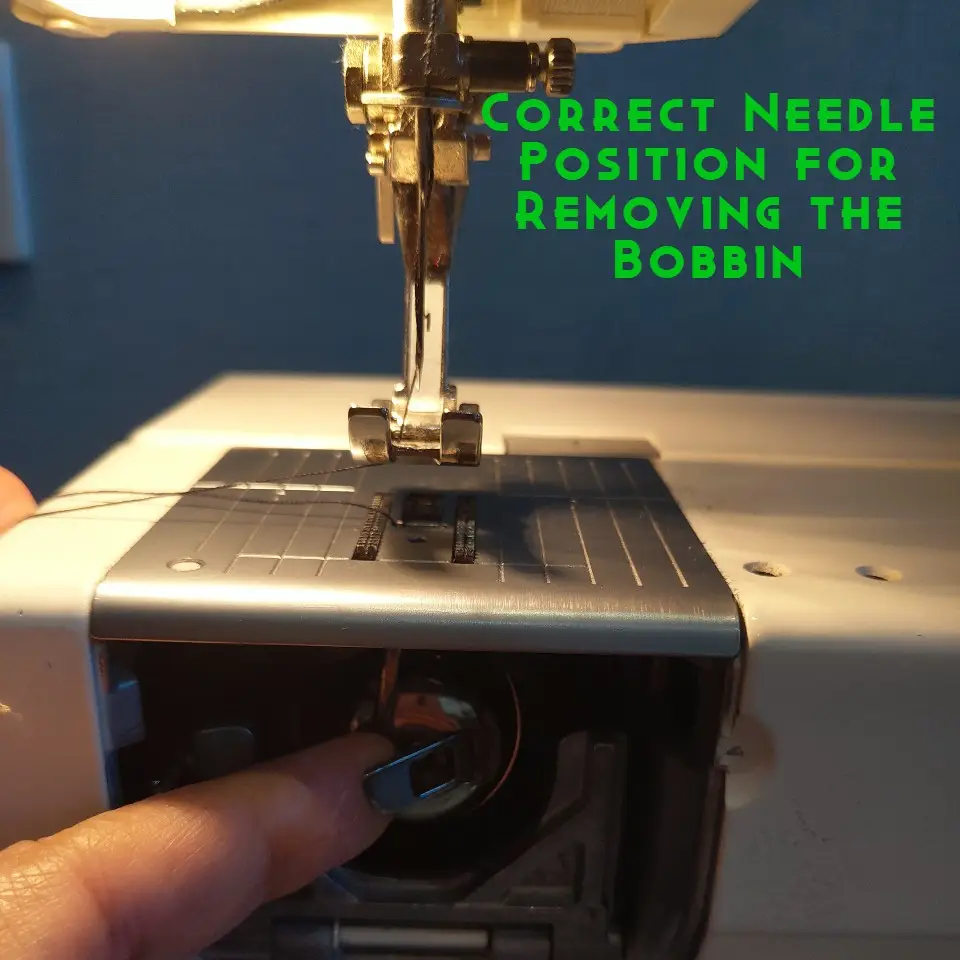
This can lead to needle breakage and also broken needle can get jammed in the feed dog assembly leading to bigger complications in the sewing machine.
4. Do not try to pull the fabric out while needle is still dipped in & the presser foot is down
If you wish to pull the fabric out of the machine, rotate the hand wheel till the needle is completely lifted up and then lift the presser foot. Now slowly pull the fabric out and snip threads at the right place.


5. Do not try to change needle position while the needle is still dipped in
Some of the machines provide you with an option of changing the alignment of the machine needle to centre, right or left. While this is a wonderful feature that allows you to manipulate your stitch line smoothly between various seam allowances and helps in other adjustments, one needs to be extra careful about when is the right time to perform this action. If you wish to change the alignment of needle, make sure that the needle is not dipped inside the sewing cavity/presser foot, as changing alignment at this position can break the needle and jam the feed dog assembly.
6. Do not use bent needles
Examine the needles closely before starting the stitch. If the needle appears to be bent (this could happen because of a previous misadventure with the machine), change the needle before continuing with your sewing projects. Working with bent needles can damage both, the fabric & the machine.
7. Thread the machine properly
Depending on the design of your machine, the top thread has to be threaded through 5-6 channels before your machine is ready for sewing. Your machine manual will elaborate this process for you. It is important to make sure that these channels have been threaded in the right order and none of these have been skipped. It might seem a bit confusing at the beginning, but you will soon get used to the sequence. Missing even one of these steps will disturb the upper thread tension that can lead to looping at the back of the seam. Whenever you feel that the seam/stitch is not coming right, check the upper thread sequence first. More than often, it is a step missed or a step mis-threaded that can be corrected to achieve a perfect seam.
8. Use appropriate stitch size as per the thickness of the fabric layers
Use bigger stitch size for thicker fabrics or when stitching over multiple layers of regular fabrics. Alternately, use smaller stitch size for thinner fabrics. Using inappropriate stitch sizes can lead to machine thread breakage repeatedly.
9. Keep control of fabric while sewing
The movement of fabric through the machine is controlled by the feed dog and presser foot assembly. The worker does not need to push or pull the fabric through the machine (this can lead to fabric and machine damage). However, the fabric still needs to be lightly controlled by hand and has to be constantly manoeuvred to ensure that the stitch falls in the right place. Never leave the fabric unsupported while working on the sewing machine.
10. Do not thread the spool manually
Lower thread tension is equally important as upper thread tension in a sewing machine. There is a provision for threading the bobbin mechanically in every sewing machine. This is to ensure that the bobbin is spooled with uniform tension. Never try to spool the bobbin by hand as this would lead to looping of upper thread in the seam.
11. Listen to your machine
If your machine is making unusual sounds make sure that you discontinue your stitching projects and explore the cause of these unusual sounds.
12. Regular servicing
Sewing machines need regular servicing to ensure that the assembly doesn’t get jammed. There is a small quantity of lint that gets entangled in the stitch assembly, every time a fabric is passed through it. This lint combined with dust can jam the overall machine assembly over the period of time. Mechanical machines are therefore brushed and oiled regularly to ensure smooth functioning. The electric foot pedal machines also have specific service routines. One can lightly brush the feed dog assembly occasionally to remove the lint and dust. The machines might need to visit the service centre once in one or two years depending on their usage.


Comments